13 min to read
Cell Detection Using MCD
MCD 활용한 노이즈 제거
CELL DETECTION using MCD
Introduction
저속촬영이 가능한 현미경을 통해 얻어진 세포동영상에서 세포활동의 추적 및 분석은 종양의 전이, 바이러스의 침입, 상처회복, 세포분열과 같은 복잡한 생물학적 과정을 이해하는데 있어 매우 중요한 역할을 담당한다. 그중 정확한 세포 검출(cell detection)은 세포 활동 추적, 이동 분석, 형태 계량화 같은 바이오 이미징 분석의 기초가 된다. 하지만 원시 검출 결과(raw detection results)에는 배경 구조물, 객체의 오인식 등으로 잘못된 영역이 포함되기 쉽고, 이러한 잡음은 통계적 분석을 왜곡시키고 생물학적 해석에 잘못된 결론을 초래할 수 있다.
MCD(Minimun Covariance Determinant)를 이용해 세포 중심 분포를 모델링하고 Robust ellipse를 기반으로 noise를 제거해보자.
IMAGE PREPROCESSING
dataset : https://celltrackingchallenge.net/2d-datasets/
source code : https://github.com/KoderWiki/CELL_DETECTION
import cv2, glob
import numpy as np
import matplotlib.pyplot as plt

IN_DIR  = "data/01"
files = sorted(glob.glob(f"{IN_DIR}/t*.tif"))
preview_files = files[1005:1006]
연속된 이미지 셋이기 때문에 glob 라이브러리를 추가로 불러와 진행.
step 1
def detect_cells(img):

    # 이미지 균일화
    clahe = cv2.createCLAHE(clipLimit=10.0, tileGridSize=(8,8))
    eq = clahe.apply(img)

    # 가우시안 커널로 흐리게 만들어 배경 추출
    bg  = cv2.GaussianBlur(eq, (0,0), sigmaX=31, sigmaY=31)

    # 원본에서 배경 제거
    fh = cv2.subtract(eq,  bg)

    # 이미지 재조정 (cv 이미지 기본형식인 8비트 정수형 변환)
    fh = cv2.normalize(fh, None, 0, 255, cv2.NORM_MINMAX).astype(np.uint8)

    # 중앙값으로 픽셀을 대체 (노이즈 제거)
    fh = cv2.medianBlur(fh, 3)
plpeline summary
① Contrast enhancement (CLAHE)
② Background estimation (Gaussian blur)
③ Backgroud subtraction (subtract)
④ Normalization
⑤ Median filtering
원본에서 배경을 빼서 추출하는 과정으로 원하는 부분 추출
step 2
    # Image Thresholding, Morphological Operations
    # gray scale 이미지를 이진화해서 일부 영역만 남김
    _, th = cv2.threshold(fh, 0, 255, cv2.THRESH_BINARY+cv2.THRESH_OTSU)

    # morphology open & close
    th = cv2.morphologyEx(th, cv2.MORPH_OPEN,  np.ones((3,3),np.uint8), iterations=1)
    th = cv2.morphologyEx(th, cv2.MORPH_CLOSE, np.ones((3,3),np.uint8), iterations=1)
이진화와 모폴로지를 통해 작은 점같은 노이즈 제거
step 3
    # 객체 정보 반환
    n, labels, stats, centroids = cv2.connectedComponentsWithStats(th, connectivity=8)

    # 흑백을 컬러로 변환
    vis = cv2.cvtColor(img, cv2.COLOR_GRAY2BGR)
참고
cv2.connectedComponentsWithStats(th, connectivity=8)
connectivity : 4 or 8 (default = 8)
4 connectivity : 상하좌우
8 connectivity : 상화좌우 + 대각선 (opencv는 보통 8)
n : 찾은 component 개수
labels : 각 픽셀마다 속하는 컴포넌트 라벨 id
stats : 각 컴포넌트의 바운딩 박스, 면적 등 통계 정보
centroids : 각 컴포넌트의 중심좌표
stats = [x_min, y_min, width, height, area]
step 4
    # 바운딩 박스 정보와 면적 추출
    dets = []
    for lbl in range(1, n):
        x, y, w, h, area = stats[lbl]
        cx, cy = centroids[lbl]

        # 너무 작거나 크면 제외
        if area < 10 or area > 800:
            continue

        # 검출된 객체를 직사각형으로 표시
        cv2.rectangle(vis, (x,y), (x+w, y+h), (0,0,255), 1)
        dets.append((cx, cy, area))

    return vis, dets
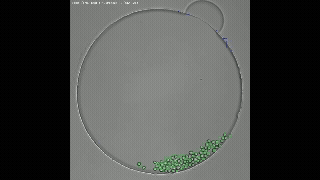
이미지 중 세포를 인식하긴 했지만 배경 구조물과 객체의 오인식으로 인해 noise가 다수 존재하고 있다.
결과
MCD APPLICATION
MCD에 관한 자세한 설명은(Thesis review, Minimum Covariance Determinant, Koder Wiki) 참조
def mcd_filter_centers(dets):

    # 검출된 점이 너무 없거나 적으면 mcd 추정이 불가하므로 inline 처리
    if len(dets) < 1:
        return np.ones(len(dets), bool)

    # 각 중심좌표로 array 생성
    centers = np.array([(d[0], d[1]) for d in dets], dtype=float)

    # 평균 0 분산 1로 표준화
    scaler = StandardScaler()
    X = scaler.fit_transform(centers)

    try:
        # MCD
        mcd = MinCovDet(support_fraction=SUPPORT).fit(X)
        d2 = mcd.mahalanobis(X)

        # threshold 보다 작은 점만 inline
        thr = chi2.ppf(ALPHA, df=2)
        inlier_mask = d2 < thr

        # 전체 outlier로 판정시 전부 inline 처리
        if inlier_mask.sum() == 0:
            return np.ones(len(dets), bool)

        return inlier_mask

    except Exception:
        # 예외처리 (에러시 전부 inline)
        return np.ones(len(dets), bool)
visualizaiton
for f in PREVIEW:
    img = cv2.imread(f, cv2.IMREAD_GRAYSCALE)
    dets, th = detect_cells_one(img)
    inlier_mask = mcd_filter_centers(dets)

    vis = cv2.cvtColor(img, cv2.COLOR_GRAY2BGR)
    kept, dropped = 0, 0

    for keep, d in zip(inlier_mask, dets):
        cx, cy, area, x, y, w, h = d

        # red : dropped & green : kept
        color = (0,255,0) if keep else (0,0,255)

        if keep: kept += 1
        else:    dropped += 1

        cv2.rectangle(vis, (x,y), (x+w, y+h), color, 1)

        # center coordinates marking
        #cv2.circle(vis, (int(cx),int(cy)), 2, (0,0,255), -1)

    print(f"{f}  → kept {kept}, dropped {dropped}  (raw {len(dets)})")

    plt.figure(figsize=(6,6))
    plt.title(f" MCD kept {kept}, dropped {dropped}")
    plt.imshow(cv2.cvtColor(vis, cv2.COLOR_BGR2RGB))
    plt.axis("off")
    plt.show()
output
세포 중심 분포를 통해 잡음을 다수 제거하는 모습을 볼 수 있다.
Visualization comparing classical and robust ellipse
기본 Mahalanobis ellipse와 MCD ellipse 비교 시각화
def mcd_fit_and_ellipse(dets, alpha=ALPHA, support=SUPPORT):
    n = len(dets)
    if n < 5:
        return np.ones(n, dtype=bool), None, None, None
    centers = np.array([(d[0], d[1]) for d in dets], dtype=float)

    scaler = StandardScaler()
    X = scaler.fit_transform(centers)

    try:
        mcd = MinCovDet(support_fraction=support).fit(X)
        d2 = mcd.mahalanobis(X)
        chi2_thr = chi2.ppf(alpha, df=2)
        inlier_mask = d2 < chi2_thr
        if inlier_mask.sum() == 0:
            inlier_mask = np.ones(n, dtype=bool)

        mu_std  = mcd.location_.reshape(1, -1)
        mu_orig = scaler.inverse_transform(mu_std)[0]
        S = np.diag(scaler.scale_)
        cov_std  = mcd.covariance_
        cov_orig = S @ cov_std @ S
        return inlier_mask, mu_orig, cov_orig, chi2_thr
    except Exception:
        return np.ones(n, dtype=bool), None, None, None

def classical_fit_and_ellipse(dets, alpha=ALPHA, ridge=1e-6):
    n = len(dets)
    if n < 5:
        return np.ones(n, dtype=bool), None, None, None

    centers = np.array([(d[0], d[1]) for d in dets], dtype=float)
    mu = centers.mean(axis=0)
    cov = np.cov(centers, rowvar=False)
    cov = cov + ridge * np.eye(2)

    Xm = centers - mu
    inv = np.linalg.pinv(cov)
    d2 = np.einsum('ni,ij,nj->n', Xm, inv, Xm)

    chi2_thr = chi2.ppf(alpha, df=2)
    mask = d2 < chi2_thr
    if mask.sum() == 0:
        mask = np.ones(n, dtype=bool)
    return mask, mu, cov, chi2_thr
classical ellipse에 비해 robust ellipse가 훨씬 정확하게 noise를 제거하는 것을 볼 수 있다.
Comparing with Isolation Forest
다른 이상치 탐지 기법인 Isolation Forest와의 비교
def iforest_filter_centers(dets, use_area=False):
    m = len(dets)
    if m < 5:
        return np.ones(m, dtype=bool)

    if use_area:
        X = np.array([(d[0], d[1], np.log1p(d[2])) for d in dets], dtype=float)
    else:
        X = np.array([(d[0], d[1]) for d in dets], dtype=float)

    scaler = StandardScaler()
    Xn = scaler.fit_transform(X)

    try:
        clf = IsolationForest(
            n_estimators=IFOREST_N_EST,
            contamination=IFOREST_CONTAM,
            bootstrap=IFOREST_BOOTSTRAP,
            random_state=IFOREST_RANDOM_STATE
        )
        clf.fit(Xn)
        pred = clf.predict(Xn)
        inlier_mask = (pred == 1)

        if inlier_mask.sum() == 0:
            return np.ones(m, dtype=bool)
        return inlier_mask
    except Exception:
        return np.ones(m, dtype=bool)
Isolation Forest 또한 이상치를 다수 제거하고 있지만, MCD에 비해 정상적인 데이터 또한 잡음으로 고립시켜 제거하고 있다.
Limitations
MCD 논문에서 언급된 대로 초반 세포 분열 이전 세포수가 적으면 이상치로 인식되는 객체가 더 많아 breakdown value에 따라 정상적인 세포 인식이 불가능 하다.
오히려 이상치를 정상으로 인식해 정상 세포를 잡음으로 인식하는 문제가 발생
또한 정상적인 세포 움직임에도 멀리 움직일 경우 noise로 판정해서 정확한 cell tracking을 분석하기에 부족함을 인지함
향후 공부 방향
향후에는 다양한 이상치 제거 알고리즘을 추가적으로 도입하여 더 적합한 통계적 기법을 탐색하고, 나아가 기계학습 기반 접근법을 활용하여 잡음 제거 성능을 한층 향상시키는 방안을 모색하고자 한다
Comments